"Bandi Mount Instructions"
PACKAGE CONTENT: 1 - Flat Black "Bandi Mount" for
CB Antenna or Flag Mount.
1 - Stainless Steel 1/4"-20 Nylock Nut.
ITEMS NEEDED: a. Masking Tape (or
equivalent)
b. Mid size Flat Head Screwdriver (or equivalent)
c. 7/16" Open-End Wrench
NOTE: a. If you intend to install a flag, you can
skip steps 3 and 6.
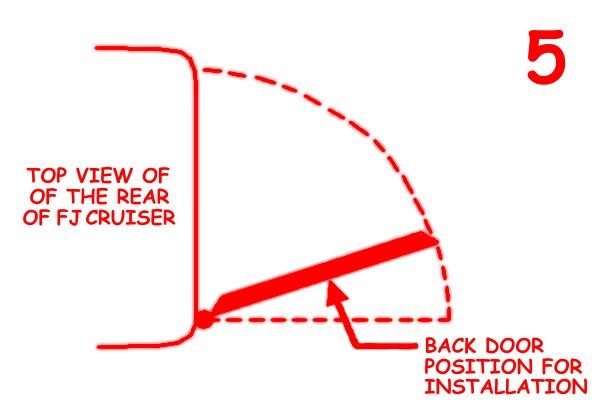
b.
Door position during installation should not be in the fully opened.
The approx.
position as shown on image "5" should be
used.
c. I test fitted every mount on my FJC, so there should be no problems with the
fit.
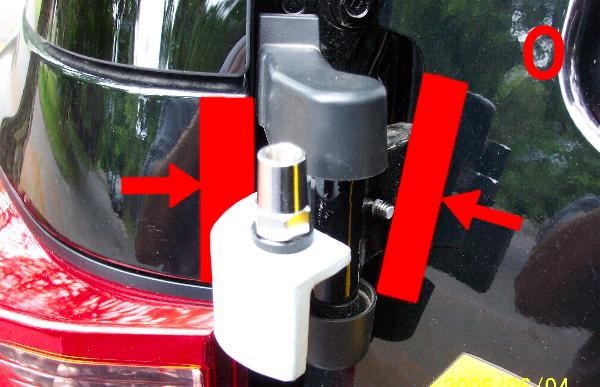
1) Before installing the mount, cover
the areas in red on Image "0" with masking tape to
protect the
FJC's paint during mount installation.
Be sure to fold it over the edges of
the body and
the door for maximum protection.
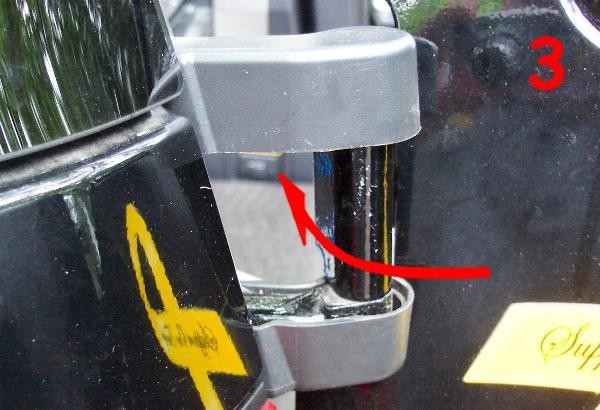
2) First, you need to remove the center plastic hinge cover. This cover is only
snapped
on over the hinge.
It has two stubs sticking out that slide into the mounting hole shown
on image "2". From
inside of the opened door, You need to spread the two halves of
the plastic cover
and push it outwards.
3) For CB Antenna mounting (unless you
get a Groundless RV/Marine type Antenna),
there must be a
ground contact for best TX/RX of the CB. You will have to
remove the
paint on the
underside of the mount in the area of contact
with the bottom section of
the antenna so
that the two pieces make contact to complete the ground. This
area
is shown in red on image "1". This can easily be achieved with a mid size flat head
screwdriver, by scraping away the paint
from inside the red circle area.
4) Install and tighten your CB Antenna
Base connector onto the mount prior to the mount
installation on the vehicle. If done at a
later time, you will need a deep socket to hold
the underside
of your CB mount to be able to tighten the top part.
5) Image "2" shows the location of the
mounting hole that is already on you FJC's Hinge.
This will be where
the mount bolt will go thru when you place the mount in position.
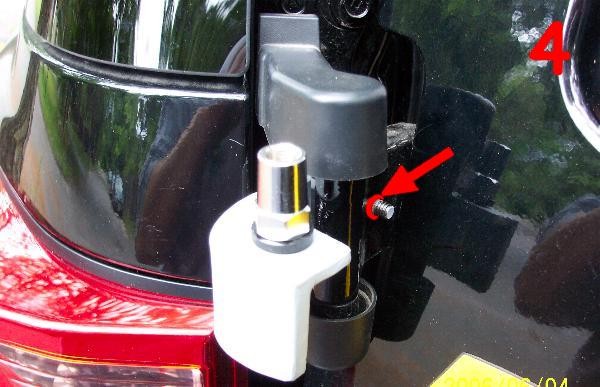
6) As done in step 2, For CB Antenna
mounting (unless you get a Groundless RV/Marine
type
Antenna), there must be a ground contact for
best TX/RX of the CB. You will have
to remove the paint on the hinge where the
stainless steel nut (included in your
package) makes contact with the
hinge. This area is shown in red on image "4". This
also can easily be achieved with a mid size flat head screwdriver, by scraping
away
the paint from inside the
red circle area.
7) With the door in position as shown
on image "5", place the mount thru the space as
shown on image
"3", and line up the bolt with the hole in the hinge and slide it thru so
that the end
of the bolt is flush with the other of the hinge.
8) Place the SS-Nut in the 7/16"
open end wrench and slide it over the hole between the
door and the
hinge. Now press the mount from the back side and turn the nut to get it
started. Snug
up the mount by tightening the SS-Nut, but
leaving it loose enough to
adjust the
mount to be centered on the hinge.
9) Close the door slowly making
sure not to damage the mount due to being out of
alignment with the hinge at this point. Do this by watching as you close
the door for
any contact
between the mount and the top and bottom hinge
covers.
10) Eye-Up
the mount from the side of the FJC and adjust it
by rotating a hair up or down
so that the
angle matches the top and bottom hinge covers.
11) Tighten the SS-Nut so that the mount is stable
and will not rotate out of position. The
bolt on the
mount looks small, but it is a grade 8 bolt and is plenty strong enough to
hold
the mount in place, and the
rough surface coating on the hinge works as
a grip
to
the mount once you tighten it
down.
Congratulation !!! You just installed your "Bandi
Mount" !!!