Welcome To
Corey's FJ Cruiser Page Of Mods
Page Two
Toyota High
Pitched Second Horn
Installed 11-14-2006
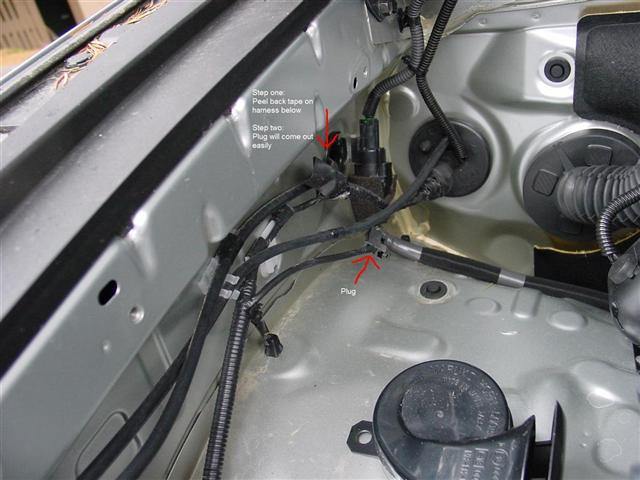
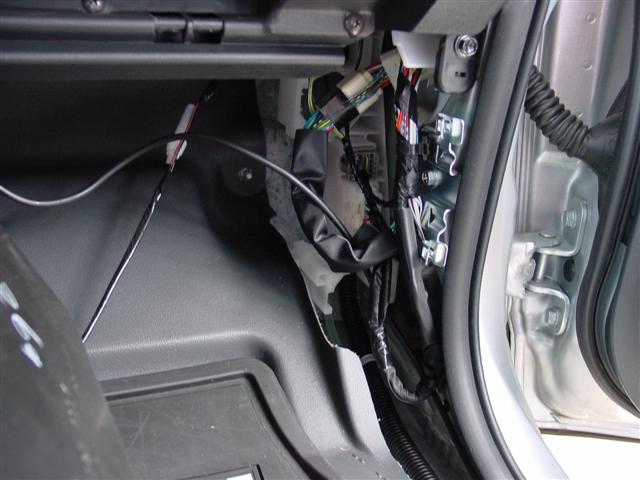
The FJ Cruiser as many other Toyotas comes with a week single horn.
However Toyota has an optional horn available for the rig, and it is pre-wired
for it.
In a wire bundle under the hood is a plug that is hidden under some thick black
tape.
You just undo the tape and inside is another wire with the plug on it.
You have then cut away a small piece of gray tape to undo that wire from the
bigger wire bundle.
The whole mod takes less than 5 minutes from start to finish.
Step One:
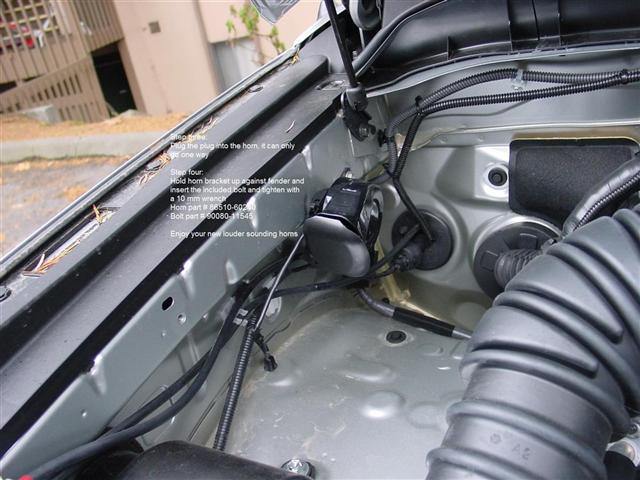
You free the plug, take your new horn and plug it in.
Step two:
Take the new high pitched horn and the included bolt and bolt it to the hole on
the inner fenderwell.
Piece of cake!
Here is a cheesy 2.5 mb video of before and after the new horn installation.
Adding the second
horn really wakes it up and hopefully will wake up rude or asleep drivers too.
Parts used:
From FJ Cruiser Off Road Gear Store (TRD Parts
4U)
High pitched horn part number 86510-60240
Bolt to mount horn part number 90080-11545
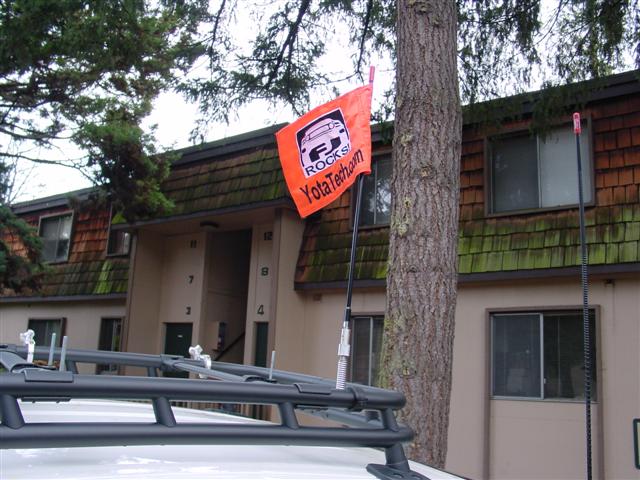
Roof Rack Flag
Mount
Installed 11-20-2006
I was not happy with
my 7' Firestik flag pole I had mounted to a trailer hitch to use in the future
if I get into running some sand dunes.
There was to much sway in it.
I saw this posted by member BDFJ, and I got in touch with his friend who
designed this.
He signed up on YotaTech, and his member name is mschradercnc.
If you would like one of these flag mounts, you can contact him there.
From the ground to the top of the mount with the heavy duty CB spring on it, it
was around 6'10".
To be legal in WA. and OR. state when running sand dunes, your flag must be
about 9' off the ground.
I cut down the 7' pole to 30", that leaves me a little over 9' tall.
I am using a quick disconnect CB antenna mount similar to what I have on my 4'
Firestik II CB antenna.
The first picture below shows his mount and the supplied screw.
That is what you get.
The other stuff on the right side of the picture is 1/2 of my quick disconnect
mount, a lock washer to go under the spring, and a bolt.
The other half of the quick disconnect you can see in the third picture at the
bottom of the black pole.
The quick disconnect lets you push down and twist to take off the flag pole,
same as my CB antenna when you do not want to have it on your rig.
When putting the bolt into the bracket, Mark designed it so you do not have to
use a wrench.
The bolt fits in a groove and is held in tight.
You just tighten down your spring, or if not using a spring, the pole.
This is really a cool mount, and a lot less sway than using a long pole.
It also frees up your trailer hitch to have a recovery shackle in there instead.
This mount is made for a 1.75" round tube such as the FJ Cruisers round tubes on
the rack.
Mark has some other cool stuff in the works for the future, so stay tuned to the
YotaTech
Forums, and my
build up thread in the FJ Cruiser section.
The flag I had made by
Devil Woman Flags, a vendor on YotaTech.
You can get just about any artwork of yours made into a flag, and she also has
custom flags already made up to go.


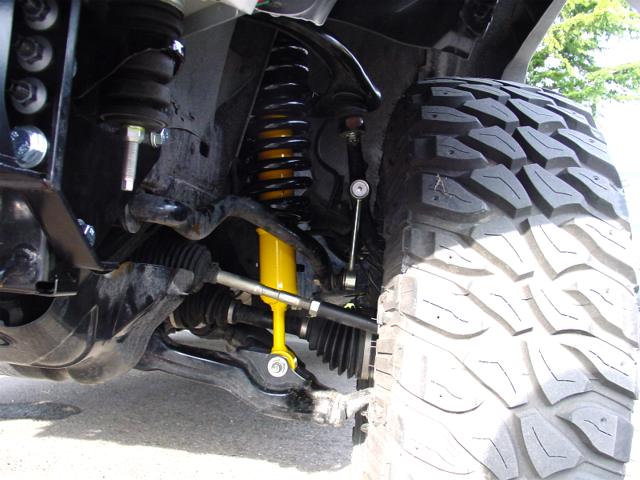
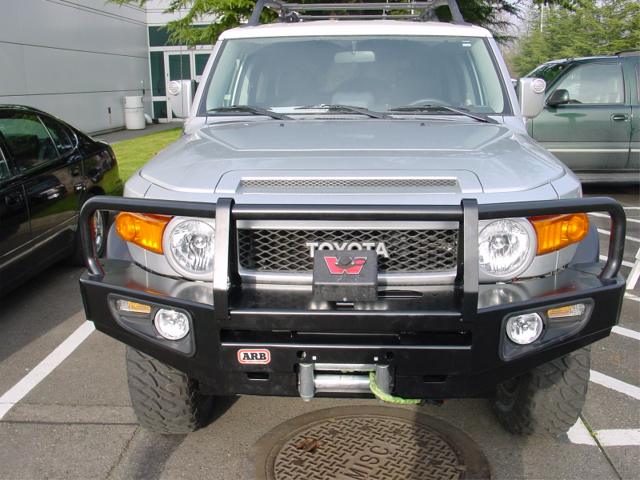
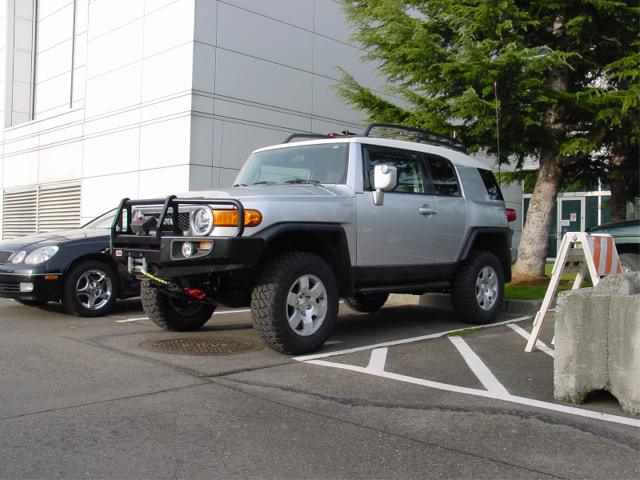
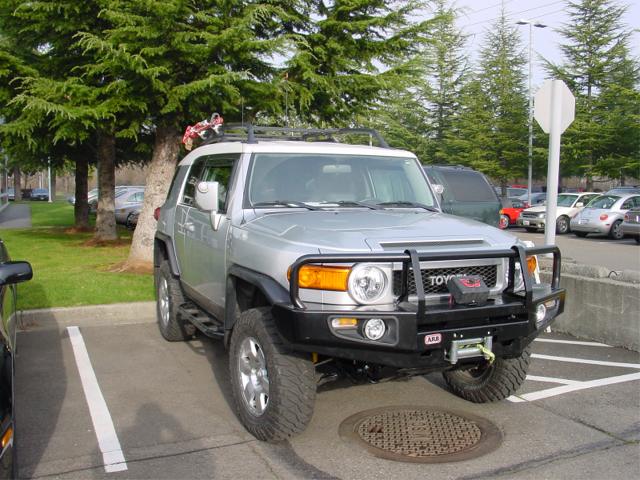
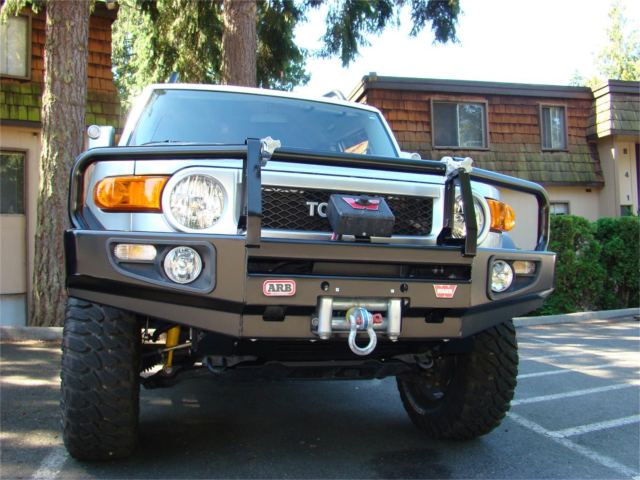
ARB Bumper, IPF
Fog Lights, OME 3" Lift, And Warn XD9000 Winch, Wheeeeeew!
Installed 12-05-2006
Finally got all the
hardcore stuff installed at the shop.
ARB, (A Real Bumper) OME 3" lift, IPF fog lights in the ARB, and my old Warn XD
9000 winch from the '91 4Runner.
Have not wired up the fog lights or installed the dash switch yet.
Why did I go with
the ARB bumper when there are others out there too?
ARB has been in the business a long time, and their products are air bag
compatible, and I really liked the quality of my old ARB on the 4Runner.
The bumper is top notch material.
For the OME lift I
have:
Front 886 coilovers, N140S struts
Rear 895 coils, N141 shocks
The Old Man Emu is a proven lift, and from all the FJ Cruiser owners I have
conversed with, they are extremely happy with the setup.
The Warn XD9000
winch is a workhorse, and perfectly suited for the FJ Cruiser and other Toyotas.
It has enough capacity to handle any situation.
I want to thank Phil
and company at TRD Parts 4U, they are an ARB dealer, and great to work with.
I have ordered quite a few things in the past for the FJ Cruiser from them, and
the pricing is very good.
In the near future I
will be installing my Ramsey Wireless Remote for the winch.
I ran that on the 4Runner, and it works great with the Warn winch.
I will get some better pictures of the whole setup and replace these with some
off road pictures as well.
The weather here has been crappy, so some better pics will come of the
suspension and bumper later on.


Parts used:
From FJ Cruiser Offroad Gear Store (TRD Parts
4U)
ARB bumper and fog lights
OME suspension
Warn XD9000 winch
IPF fog lights and in dash switch,
call them for info at the above sites.
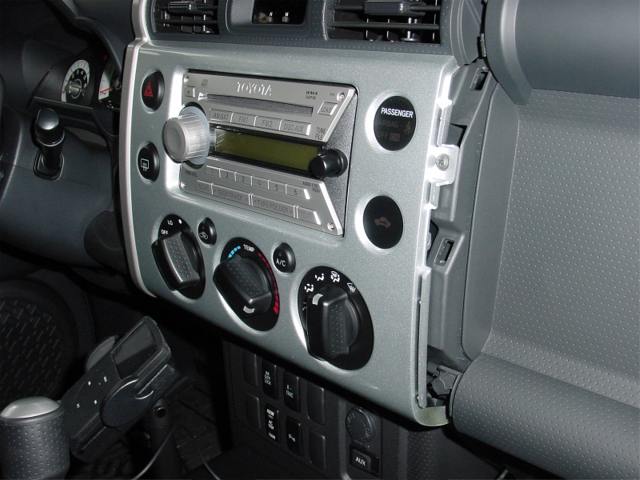
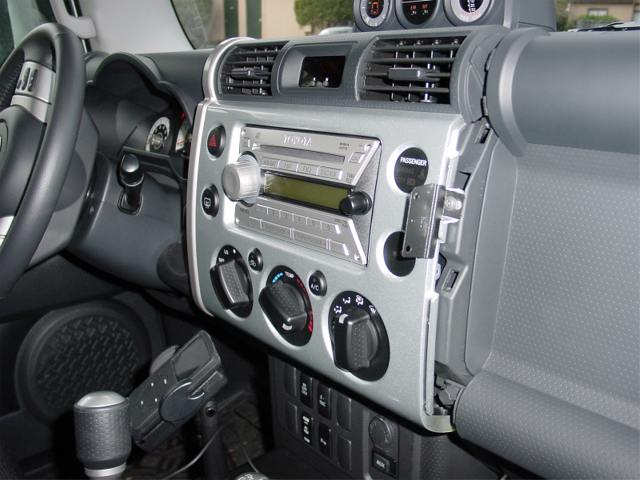
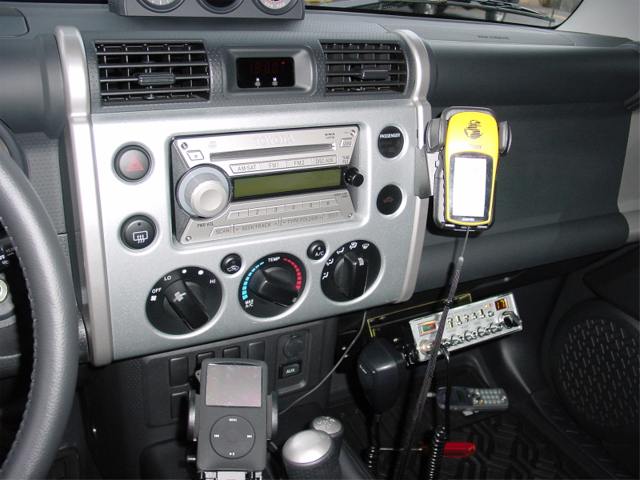
Panavice Dash
Mount And Panavice Portagrip 2000 Mount
Installed 12-13-2006
You can use this mount
for your iPod, cell phone, or a GPS.
I already have a very nice iPod mount, but it is kind of in the way of my A Trac
and E Locker buttons.
I may move the iPod up above now, or use this for a GPS mount depending if I can
get a signal there or not.
Very easy to
install.
1. Take off the plastic wing with one screw at the bottom of your stereo dash
and pull it off.
2. Take the small metal piece and put it under the screw on the right or left
side of the radio bezel, depending on which side you will mount it.
I chose right side.
3. Put the dash plastic wing back on again.
4. Use the two small acorn nuts to put the rest of the Panavice mount to the
smaller piece.
5. You can pre-mount the PortaGrip to the backing plate first like I did.
It will be much easier this way.
You can also use a wide variety of cell phone mounts, it just happens that I am
trying out the PortaGrip one.


Parts used:
Panavice FJ Cruiser mount # 751372007
Panavice PortaGrip mount #702
Inchworm E Locker
Guard
Installed 11-21-2006
I wanted to have
protection on my Elocker motor, as I have heard they can be quite vulnerable to
getting smacked by rocks/locks that you may navigate over while out on the
trail.
I contacted owner Jim to see if he had one, and he said indeed he did for the
Tacoma, and it also fits the FJ Cruiser to a T.
I do not have an installed picture of it on my rig, so I am using one of Jim's
from his website.
The first picture though is mine taken on my PC desk.
It goes on with three bolts that you already have that hold the motor cover in
place.
If you pull the bolts out gently and do not break the gasket seal to the motor,
there is no need to replace the gasket.
Simply insert the guard in place, and bolt back up.
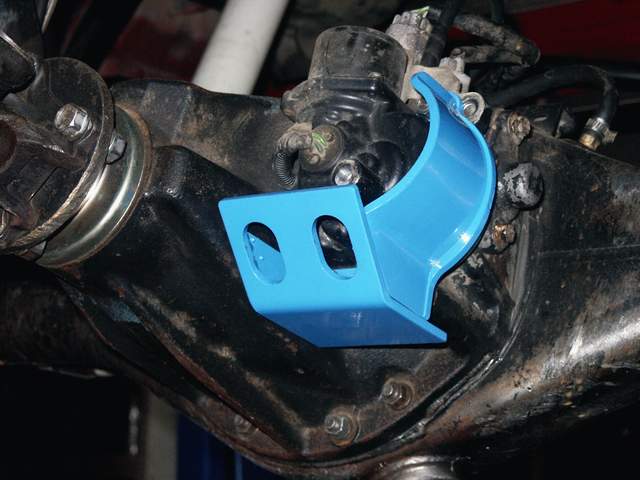
Parts used:
Inchworm Gear "Electric Locker Motor Guard"
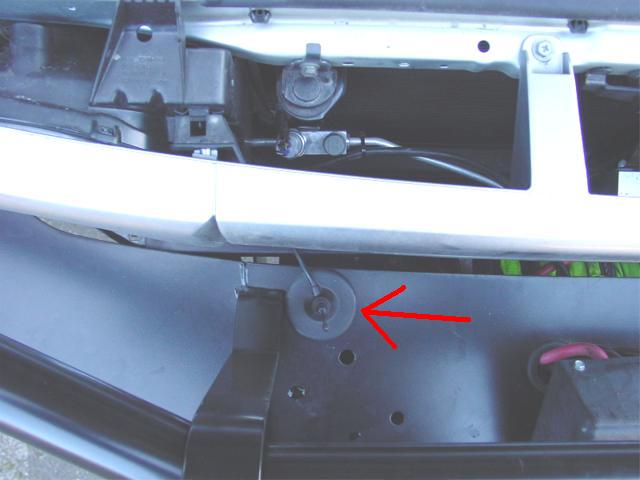
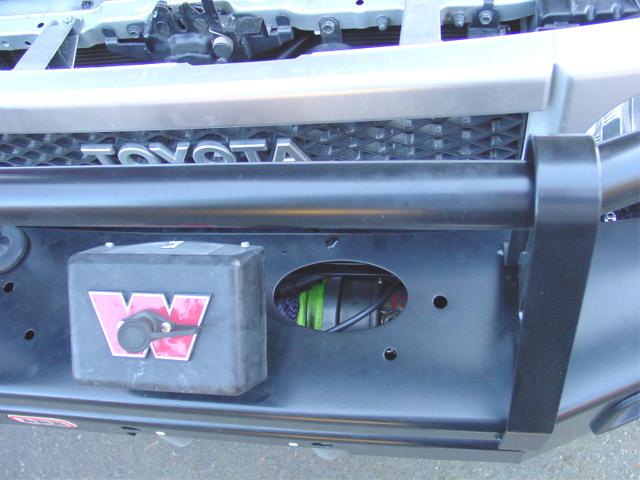
Ramsey Wireless
Remote Winch Control
Installed 12-17-2006
Got a brand new
Hitachi cordless drill as an early Christmas present, so I decided to go out and
install my Ramsey Wireless Remote for the winch that I use to have installed on
the '91 4Runner.
Piece of cake to install, did not even need the directions, I remembered from
the last time.
Basically you mount the receiver box where you want, it needs no power of its
own.
You plug in the antenna cable and mount your antenna where you want it, it has a
magnetic base.
Then you plug in your winch line that goes to the solenoid box, and the other
end goes to the black receiver box.
When not using the winch, disconnect the plug end that goes to the winches
solenoid.
I have mine stored inside the access hole for the winch.
The wireless remote works great, around upto 100', better than Ramsey's claimed
50' range.
When using the remote, you hold down the on/off button for about three seconds
to energize the receiver and turn the remote on.
The other two buttons on it are the in/out controls for your winch.
I really enjoy using this, it is a lot less cumbersome than using the bigger
supplied wired remote that comes with the winch.
In the pictures below you will see:
1. All the parts laid out before installation
2. The receiver box mounted to the side of the fenderwell
3. The antenna with magnetic base sitting on top of the ARB bumper which I may
move to under the hood later
4. The cable stored inside of the bumper on top of the winch
5. A front shot showing the plug plugged into the winches solenoid
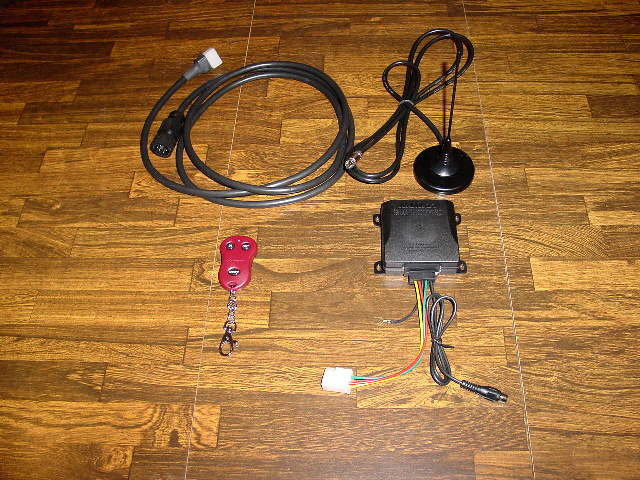

Parts used and
technical links:
Ramsey Wireless Remote winch control with video
More from Ramsey
A good installation and test from Rockcrawlers site
Ramsey's installation guide in PDF format
A short video I made of rescuing a stuck FJ Cruiser
The above rescue video will work
better if you right click and save it, then view it.
Kilby License
Plate Mount
Installed 12-16-2006
I had one of these
for the ARB bumper on my '91 4Runner.
To be honest with you, I never ran it.
The mount uses Maglites flash light mount clips used to hold their flash lights
to things.
The clips bolt to the black metal plate, and your license plate does the same.
Then you push the clips over your roller fairleads to hold it in place.
I did keep it behind the passenger seat just in case I was asked by the law to
put it on.
But in the four years I ran the bumper on the 4Runner, not once was I ever
looked at for not having a front plate installed.
The new ARB bumper for the FJ Cruiser has two holes that you insert plastic
screw hole mounts into so you can mount your stock plate to.
This will clear your fairleads for your winch.
You can see the white plastic inserts in my first photo below above the roller
fairleads.
In the next two pics you can see the roller fairlead license plate holder.
The plate will no doubt just reside in the FJ Cruiser until I get pulled over,
if I ever do.
Then asked where my plate is, I will let he/she know I have one and install it
then.
I think they are pretty laxed around my area about having a front plate on an
aftermarket bumper.
Parts used:
Kilby Enterprises
4Wheeler Supply
Ellis Precision
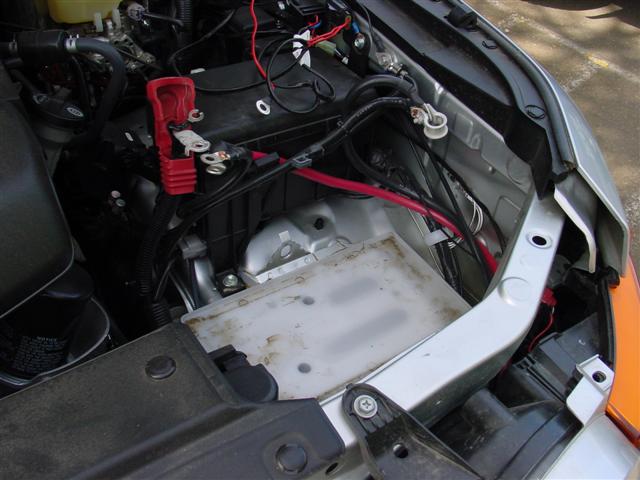
Battery Clamp
Installed 1-8-2007
A little bling, a
lotta of functionality!
The stock battery clamp is suffice, but Joel (FJoel on YotaTech) who owns Ellis
Precision makes custom battery hold down clamps that are pretty beefy, and well,
they look great!
Joel can get them anodized in any color you want, and also clear coated.
I opted for a plain one and clear anodized, and had him put YotaTech.com on it.
Pretty slick 'eh?
You simply remove
the stock Toyota one and put his on.
You will notice the heavy duty feel of his immediately.
If you would like to order one, you can contact him on YotaTech, and drop him a
PM, or check out his website.
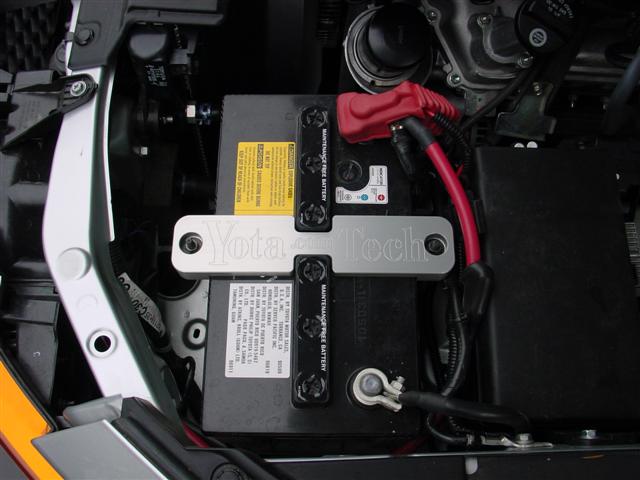
Parts used:
Ellis Precision battery hold down clamp
Winchline.com's
5/16" X 100' Viking Trail Line With Winch Safety Thimble
Installed 1-20-2007
I will not go into
much detail here, as I have a writeup in the
Tech section on YotaTech on the installation of
the new winchline.
I was not to happy with the safety hook on my old Masterpull synthetic
winchline, as it would often seize up on me.
Did some research on
YotaTech, and saw some links to Winchline.com's website.
Very good gear they carry, and I was drawn to the Viking Trail Line with the
safety thimble on the end of it as seen in the GIF below.
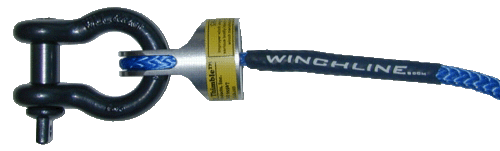
With the safety
thimble you have no line hanging down exposed to the elements, and no hooks
either.
The safety thimble gets pulled in tight to your fairlead.
All you have to do when using the winch is put on a 3/4" D ring shackle through
the hole in the thimble as shown above.
Secure that around your tree saver strap or to someone's rig you are rescuing.
For more pictures on the installation, please see the links below and read my writeup on YotaTech.

Parts used:
Winchline.com
5/16" X 100' Viking Trail Line with Winch Safety Thimble
Link to article on YotaTech on installation of the new winchline
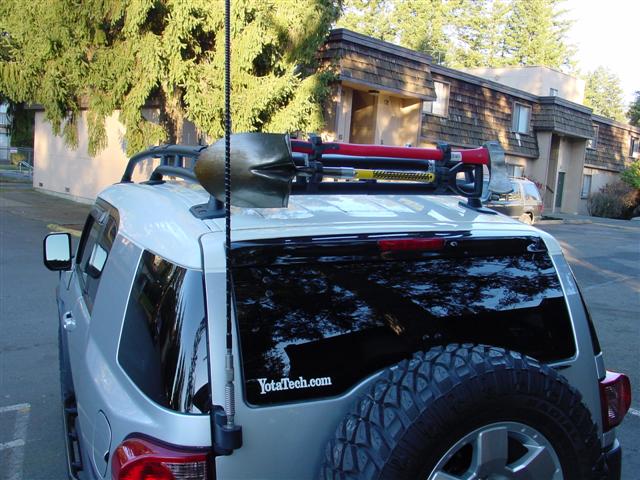
Fourtrek's Dual Axe/Shovel
Mount
Installed 1-30-2007
This is Fourtrek's
new axe/shovel combo mount.
Hey, I bet ya read earlier here how I made some really cool homemade axe/shovel
mounts.
They work great, and they also tuck the two tools up inside the rack for a more
aerodynamic and stealthy look.
But they are a lot harder to put up and take down.
I have to use my 4' carwash ladder to put them up there, and if taking them down
in the field, I would have to climb up on the left rear tire.
With the new setup, all I do is open the rear door, step up on my Warn shackle
mount, then step up again onto the back of the bumper which is also a step, and
I am at the perfect height to access the axe or shovel.
Note the aluminum
strip in the first picture, it joins two of the Quick Fists mounts together so
the set of two can be mounted to one of the round rings that goes onto your roof
racks round tubing.
In the second picture is one groady white roof that is normally covered up by
the rear door ;)
That is from the pine tree I park under, and also from the rig not having a bath
yet this winter.
That crap piles up fast under there.
You can see just the round rings mounted to my rack there.
In the third picture you can see the Quick Fist mounts mounted to the round
rings, and also Fourtrek's Hi-Lift mounts towards the right side of the picture.
In the fourth
picture the shovel and axe are in the mounts.
Please note that cool YotaTech.com sticker on the rear window too ;)
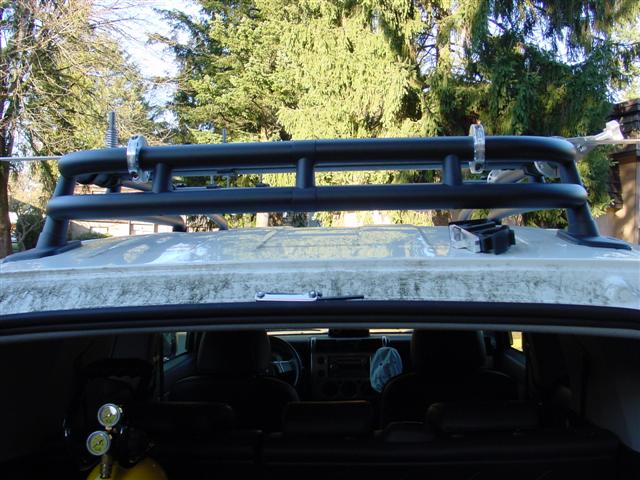
Parts used:
Fourtreks
Axe/shovel combo mounts (Luke will add the
rings with the mounts to the shopping cart at a future date so you can get the
whole shebang like mine with just one click of your mouse)
1.75" rings for the stock FJ Cruiser rack
Shovel mounts and rings
Axe mounts and rings
Please note that the two latter are identical, Luke just has a shovel and axe
separately to show you what they look like.
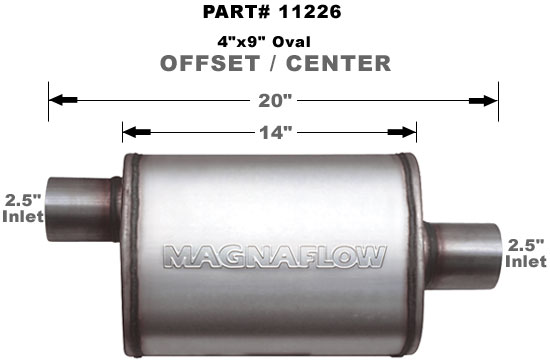
Magnaflow 11226
Muffler
Installed 2-2-2007
I ran a Magnaflow
11225 muffler on my '91 4Runner.
It can be heard
on my exhaust page I compiled several years
back.
The FJ Cruisers
stock exhaust pipe is 2.5", so I contacted my local muffler shop "Auburn
Muffler" to see if they had the Magnaflow 11226 which is a 14" can with two 3"
extensions at each end, and sized at 2.5".
They did, and were happy to take my money and install one for me ;)
Not that the stock
muffler sounded bad, quite the opposite.
It has a nice low tone to it, but not loud enough for my tastes since I was use
to hearing my Magnaflow on the old rig.
Below is a picture of the stock Toyota muffler and the new Magnaflow 11226.
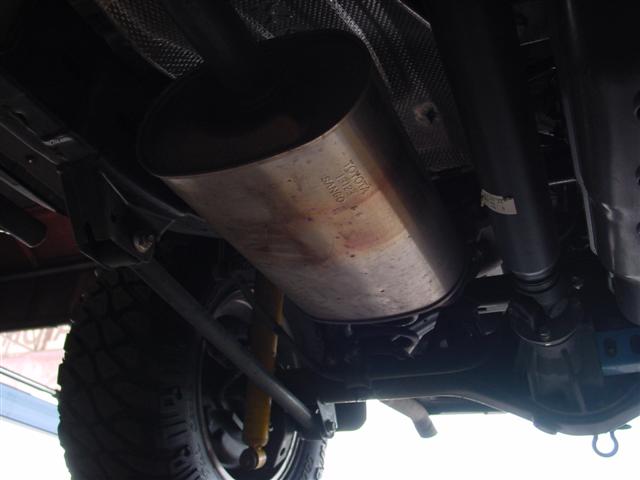
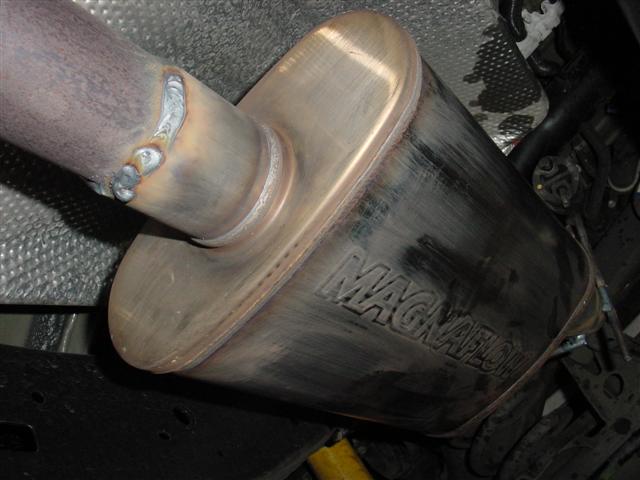
The new Magnaflow muffler is tucked up higher than the more oval shaped Toyota muffler, so this may even help some for ground clearance.
Here are three
videos I merged into one with Windows Movie Maker, and it will play full screen
if you want.
3.83 MB WMV file.
It should sound a lot better too in 4low going up a hill climb, will get some
next time I am off road.
The video does not
do the new muffler justice, as it sounds a lot better in person.
I have more low end torque it seems, but without access to a dyno, I can not
tell.
I do not think anyone will be disappointed with this muffler if you just want to
replace the stock one.
If you do not like anything louder than the stock muffler, then this Magnaflow
is not for you!
But I dig it, and already turned a few heads with it tooling around this
morning.
Magnaflow also makes
a full catback system you can buy from them, but I felt since my tubing is brand
new, why replace the whole thing when only the muffler needs to be replaced.
Here is a video on their site that shows the sound of the
Magnaflow.
I have no idea though of the can they are using, but the sound is similar.
Parts used:
Magnaflows website
Magnaflow 11226 muffler
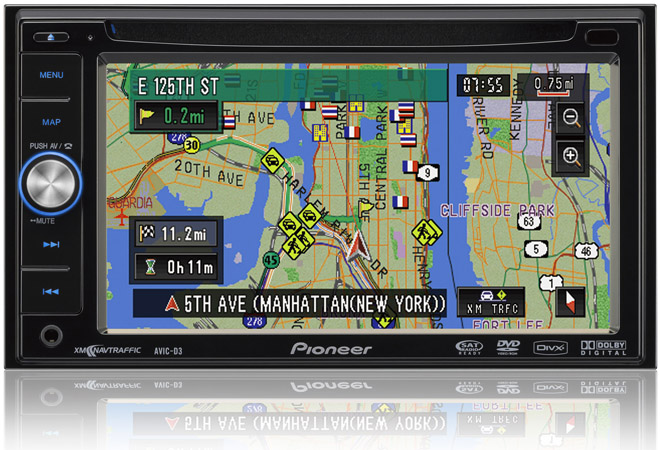
Pioneer AVIC D3
Stereo
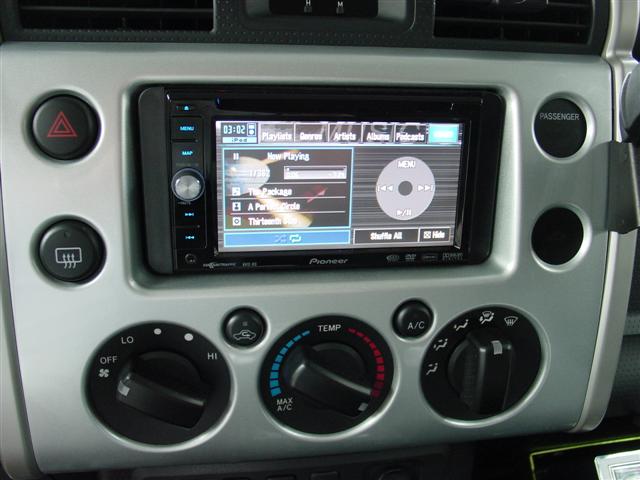
Installed 3-31-2007
My FJ Cruiser came with a
6 CD MP3 capable stereo that lets you hook up an iPod and other music players
via auxiliary port.
The FJammer as the stereo is called is not bad, but not loud or clear enough
when turned up.
And the iPod support via the auxiliary jack sucked, you still had to do
everything via the iPod itself.
That was fixed when
I installed the DICE iPod integration kit as seen elsewhere here in my mods
section.
However, the FJammer is still a weak system.
I had Cartoys install the new Pioneer AVIC D3 DVD navigation server as they call
it.
Yeah, it is called a server, not a stereo.
Believe me, it really serves up the data to you in fine fashion!
It has the usual 3
FM bands for saving presets to, the AM band, CD discs support for MP3, WMA,
regular music discs, DivX vids, DVD movies, and iPod support.
You can even get a Bluetooth add-on to use with your cell phone if so equipped
with that feature.
It also supports XM and Sirius satellite radio modules that must be added in
order to listen to satellite radio.
On the iPod support, you must buy a cable for it, the CDI200.
Once installed, you control the iPod completely via the headunit.
On the screen of the headunit it looks exactly like your iPod.
How cool is that?
The only time you ever have to physically touch your iPod is when you select
iPod video playback from the headunits touch screen.
Touch screen you say?
Yeah, I was going to
get to that ;)
Most functions are all controlled via the Pioneers LCD screen with your finger.
Very rarely do you have to use the other two buttons labeled Menu and Map.
The headunits LCD
screen is a widescreen that supports the 16:9 ratio for widescreen format of DVD
movies that are encoded for it.
In other words, no black bars top or bottom on your screen!
Some have complained
that the unit only has one disc slot.
To use the navigation feature, you need to leave the DVD in the slot so it can
pull the info when you program in new routes.
You can take out the DVD once you start to use the system to navigate for you,
as it puts the data into memory.
For me, I will leave the disc in at all times, unless I am going to park
somewhere and watch a DVD.
To be honest with you, that will not happen to often, if at all.
Besides, music discs are so stone age.
Even the cavemen have moved upto iPods now, and my iPod Video is the 30 GB one,
so I have all of my music CDs ripped to it anyways, and my entire MP3 collection
on it.
Who needs discs anymore???
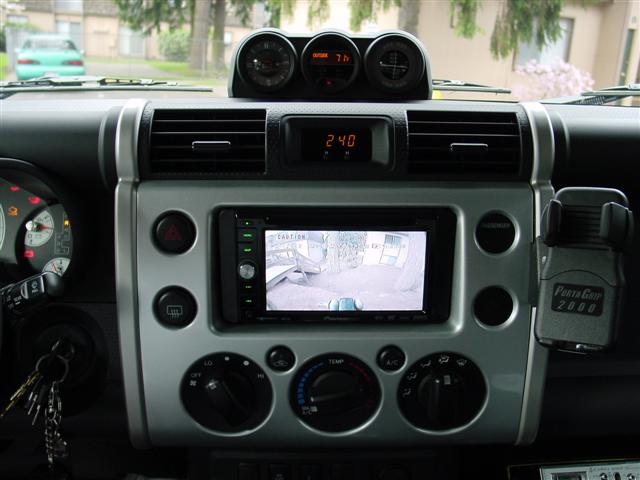
I also had them
install the Pioneer backup camera model NDBC2.
The backup camera comes on anytime you put the vehicle into reverse, regardless
of what else is showing on your screen.
You can also go into the navi menu under the various map views you can choose
from, and select camera.
This will allow you to see full time what is behind you.
Pretty cool feature, and really lets you see the tailgaters.
Also installed was the Swips adaptor so my steering wheel controls would work as before with the new headunit.
Below are some
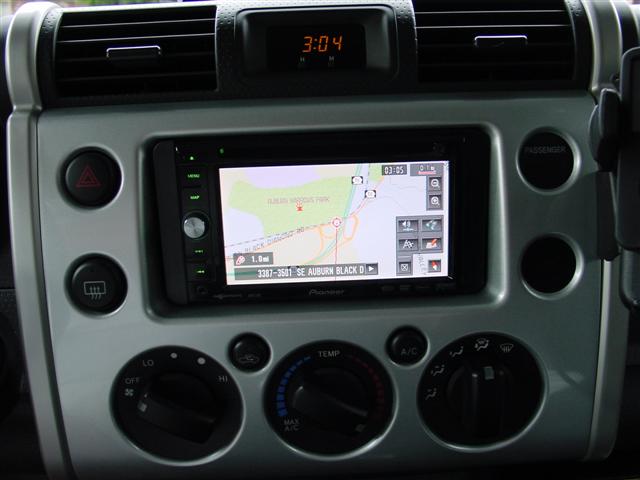
specs of the headunit taken from Cartoys website:
Find the perfect route
The Pioneer AVIC-D3 in-dash navigation system comes with two DVD-ROMs containing
a massive Tele Atlas database, enabling the unit to provide a massive network of
turn-by-turn routable roads. Within seconds, the unit’s extremely fast processor
calculates multiple routes and provides directions to destinations via the
graphic map interface and voice guidance. In addition, you’ll have access to
12-million points of interest throughout the United States and Canada, meaning
the nearest gas station, restaurant, or ATM is always only a finger’s touch
away.
Circumvent congestion
Add the optional XM NavTraffic™* service to the AVIC-D3, and you’ll be one step
ahead of traffic every time. Using the available GEX-P10XMT XM NavTraffic™
Satellite Radio Tuner, traffic information is provided through a continuous
broadcast. The AVIC-D3’s intelligent navigation will alert you of traffic jams
and provide alternate routes. And with XM’s satellite radio service, you’ll be
able to enjoy a great selection of music, talk, and sports channels with loads
of exclusive content. Being aware of traffic has never been easier.
Sharp look. Smooth fit.
In addition to being multifunctional, the AVIC-D3 was designed with ease and
style in mind. The unit features a “double-DIN” size that’s standard in many
vehicles, providing a perfect placement in the dashboard for a fit and finish
similar to factory systems. And the integration gets even better with the
AVIC-D3’s multi-color illumination, which gives you the ability to match the
interface to the colors of your dashboard, or your mood.
Best seat in the house
Whether your preferred media is CD, DVD, MP3, or satellite radio, the AVIC-D3
has an array of multimedia options to enjoy in high quality playback. Navigation
functions and multimedia playback can be enjoyed simultaneously, thanks to the
AVIC-D3’s memory navigation, which allows you to load a route, eject the
navigation disc and pop in a CD or DVD.
Connect and direct your iPod®
How much music and video can you bring to your AVIC-D3? That depends on how deep
your iPod® library is. In addition to the built-in arsenal of multimedia
playback options, Pioneer iPod-ready navigation systems like the AVIC-D3 make
integrating your iPod® simple with the optional CD-I200 iPod® connector. And
control of your iPod® music and video library is quick and seamless via touch
screen control of the intuitive graphic menu. Once you try the AVIC-D3’s iPod®
playback, you’ll be using it to play all of the songs, podcasts, and videos you
can get your hands on.**
Go wireless with Bluetooth
It’s time to put that phone down. Thanks to the optional CD-BTB200 Bluetooth
adapter, you can make and receive phone calls hands-free when you sync a
compatible Bluetooth-enabled cell phone to your AVIC-D3. Once you’re connected,
during a call you simply talk into the unit's included microphone while
listening through your in-car speakers. To make calling even more convenient,
for certain compatible Bluetooth-enabled cell phones you can copy and store your
numbers from the cell phone to your AVIC-D3’s internal phone book. Once you’re
set up, you may never have to lay a finger on your cell phone to make a call in
your vehicle again.
Display Features * Screen Size/Aspect Ratio 6.5 inch / 16:9
* Pixels 336,960 (1,440 x 234)
* Touch Panel
* Anti-Glare Screen Coating
* Dimmer Control Intelligent
* Picture Adjustment Brightness, Contrast, Color, Hue, Dimmer Settings
* Motorized Display Motorized Open/Close
DVD/CD Player * DVD Video Playback DVD/DVD-R/-RW
* CD Playback CD/CD-R/-RW
* iTunes/DivX/WMA Playback
* ID3 Tag / WMA Text ID3
* CD Text
* Auto Scroll
* MP3 Track List
AM/FM Tuner
* Supertuner Supertuner IIID
* 24-Station/6-Button (18FM/6FM) Presets
* BSM (Best Stations Memory)
* Local Station Setting Selectable (4-Step)
Audio Features
* Built-in Speaker Power MOSFET 50W x 4
* Continuous Power Output 22W x 4
* Equalizer EEQ (3-Band Parametric)
* EQ-EX
* SFEQ (Sound Focus EQ)
* Loudness
* Source Level Adjuster (SLA)
* High-Pass Crossover (HPF) 50/80/125Hz, -12dB/Oct.
* Subwoofer Crossover (LPF) 50/80/125Hz, -18dB/Oct., +/-12dB
* RCA Preouts 3 pair (Front, Rear, Sub/Non-Fading)
* Preout Voltage 2.2V, 1k Ohm
Receiver Features
* IP-Bus System Control
* XM Satellite Ready
* iPod Adapter Ready Yes (Full Control, Multi-Line)
* Multi-CD Control
* DVD Control
* AV-Bus Input
* 1 Composite A/V Input
* Back-Up Camera Input
* Rear-View Camera Mode
* 1 Composite A/V Output
* Bluetooth Capable (Optional CD-BTB200 required)
* Dimensions 2DIN (7" x 4" x 6-1/2")
* 1 Year Warranty
OK, on with a few
pictures.
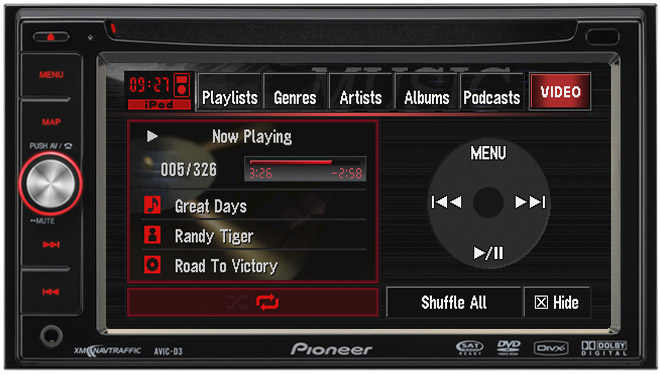
First up shows the iPod support on the headunit.
You can see the click wheel of the iPod on the screen.
It is all done by touching the screen.

Next up shows what
the radio and map screens look like.
Not shown is the many other map screen variations.
You can also show what your vehicle looks like going down the road, and to the
right of that is your actual map portion with the street names you are coming up
on.

Next up shows the
backup camera mounted to the rear bumper just below the spare tire, and a view
from what I see from inside the cabin.
The camera although mounted low, is at the perfect spot to see everything behind
me.
What you see at the bottom of the LCD screen is my Warn Recovery Shackle.

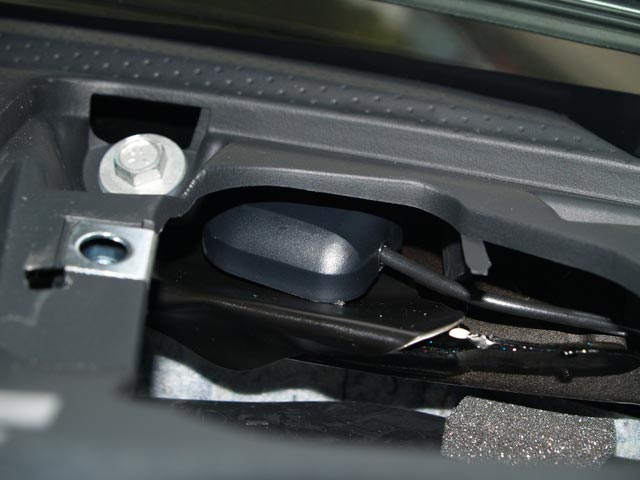
Next up is a picture
I saw on another forum of where the GPS antenna is located.
The front right speaker is taken out, the antenna put in, then the speaker put
back, and the cover goes back on.
The antenna works prefect there, even when covered up by the speaker grille.
The price is right
for a unit like this that can do all it does.
There is even voice commands to tell you where to turn when using the navigation
part, just like the Tom Tom units do.
I have used it already a few times to find places, and it is dead on when
guiding me.
I probably will not
add in an amplifier for the speakers, as the headunit puts out a lot of sound.
However in the future I will have Cartoys add back in my old school Rockford
Fosgate 500a2 amp and run dual 10" subs in a custom box made specially for the
FJ similar to the picture below.

Here are a few additional pictures from Pioneers website showing the detail of the LCD with both the navigation map and the iPod screen.
And last but not least, I have a 5.1 MB WMV video I shot after coming back from the installer.
Parts used:
Pioneer AVIC D3 from Pioneers website
Pioneer AVIC D3 headunit from Cartoys
Pioneer NDBC2 backup camera
Pioneer iPod cable CDI200
Swips steering wheel adaptor, no part number, and it was thrown in for me from
Cartoys, I am such a good customer of theirs :)
ARB
Fridge/Freezer
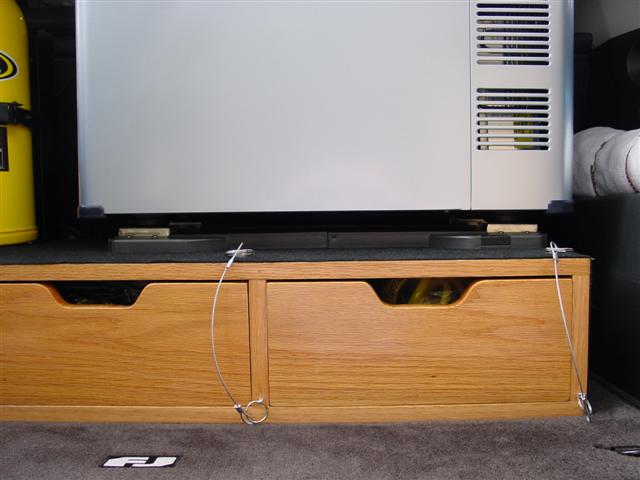
Installed 4-21-2007
I have been wanting
a fridge for quite some time.
I hate taking coolers camping and having the ice melt.
I have a nice 3 way fridge (12v, 110v, and propane) that I have sued when
camping, but it would suck the battery dry in a few hours.
The ARB fridge (Norcold and Engel brands are the exact same thing) use a swing
arm motor design and are very energy efficient.
I ordered an Engel Slide Loc which screws to a surface with 4 to 6 screws,
depending on how many you want to use.
I went for 4 this time, but may add the other 2 for extra insurance.
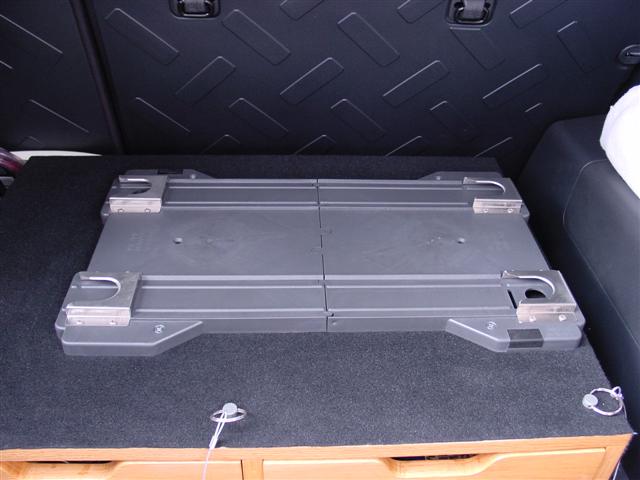
It called for drilling 1/8" holes, piece of cake in the wood top of my cargobox.
Once the first hole was drilled, I put a screw in to keep the Slide Loc was
shifting on me.
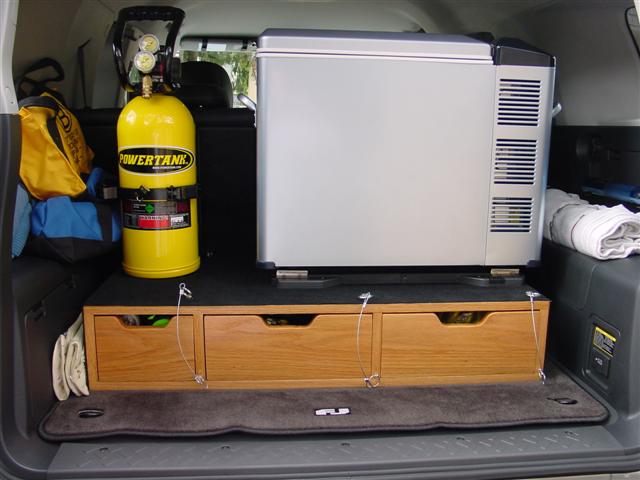
The Slide Loc is all the way to the right side of the cargobox, which leaves me
plenty of room to slide the fridge in around the Powertank, no problems at all.
There is only 1 lock button on the Slide Loc to worry about when you want to
disengage the 4 feet on the fridge.
The package comes with 4 new feet.
You simply unbolt the 4 stock feet and put on the 4 new ones that are made to
slide into the Slide Loc unit.
I can not lift up the lid all the way, this is a big fridge, 43 qt, but I did
not want anything smaller.
I plan on using this for a long time, and want it to be able to hold a weeks
worth of food for camping.
This is also a freezer, so when we go on runs this summer, the crowd is going to
get treated to some ice cream bars
Here are some pics of the installation.
The first 2 show the Engel Slide Loc, the last 2 show the fridge mounted to the
Slide Loc.
The release button is at the back left side, very easy to reach with the fridge
mounted.

I am currently
thinking of moving the fridge to the rear drivers seat after I do some fabbing.
It will let me lift the lid up higher, and free up some cargo room.
Parts used:
ARB fridge/freezer part #MT45FARB Bought from
TRD
Parts 4U, and will called at ARB Headquarters
Engel Slide Loc
Blue Sea
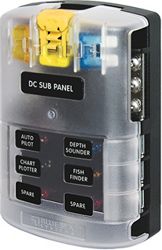
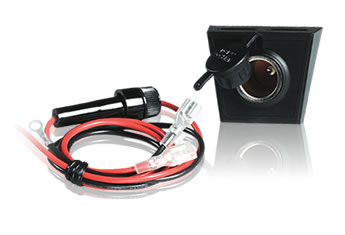
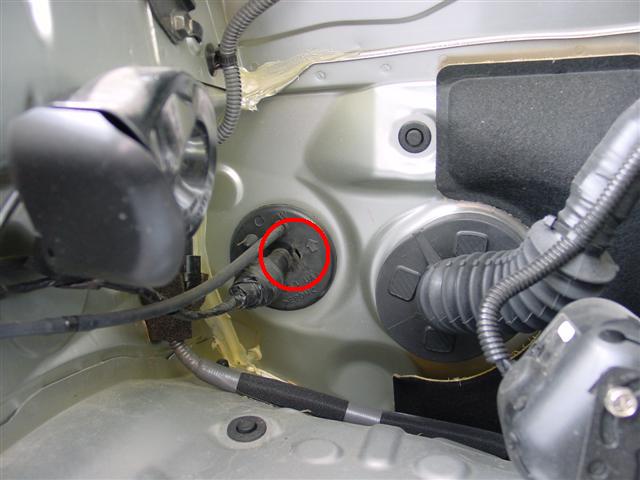
Auxiliary Fusebox & Twin 12v Outlets
Installed 4-28-2007
Thanks to member
KD7NAC_07FJ (Wayne) for coming down to my home today to help on this project.
Take one Blue Sea 6 gang fusebox
Tie it in with 6 gauge wire from the battery to it, and run 18-Gauge Red & Black 2-Conductor back to twin 12v outlets
and you have a
recipe for adding several circuits easily from inside the right front kick
panel.
I will utilize one of the 12v outlets in the back to power my new ARB fridge.
All connections are soldered and have shrink tubing added to them.
Wayne used a small butane torch to solder the connections with.
A lot of perfection went into this.
I would have crimped the ends and called it a day, but Wayne is very experienced
at this and went all the way with the solder and shrink tubing, very
professional.
The first 2 pictures show a few things torn apart.
You have to remove the floors threshold by grasping it and pulling straight up.
Once removed you can easily take off the passenger side kick panel with a
plastic thumbscrew which is all the way forward.
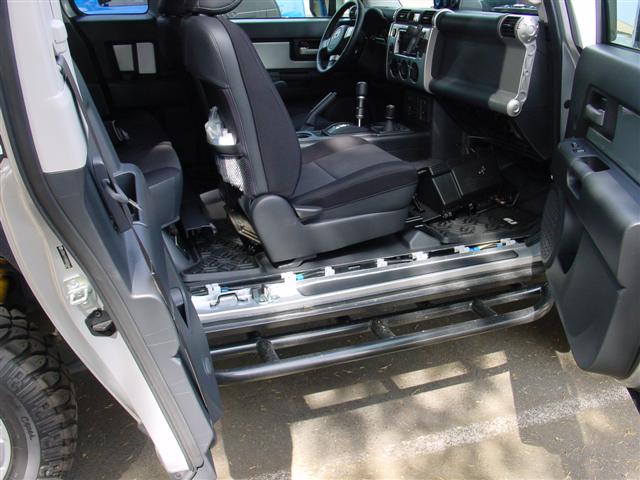
Wayne ended up
taking the battery out to gain better access to the wires presently on the
battery.
We moved the CB power wire off of the battery and it is wired inside the cabin
now with the new fusebox.
You can see in picture 4 a slit inside the read circle which was already there
from running the CB wire to the battery.
Pictures 5 and 6
show the panel you remove by inserting a small flat tipped screw driver and
prying it outwards.
Picture 5 still has the yellow sticker on it with info on the 10v converter
outlet.
You remove the yellow tape and use a hole saw sized at 1 3/32" and drill 2
holes.
You can also use a knife and make a small incision since the 12v plug has a
"key" on it to hold it tight so it will not spin on you.
Picture 6 shows the twin 12v outlets in place.

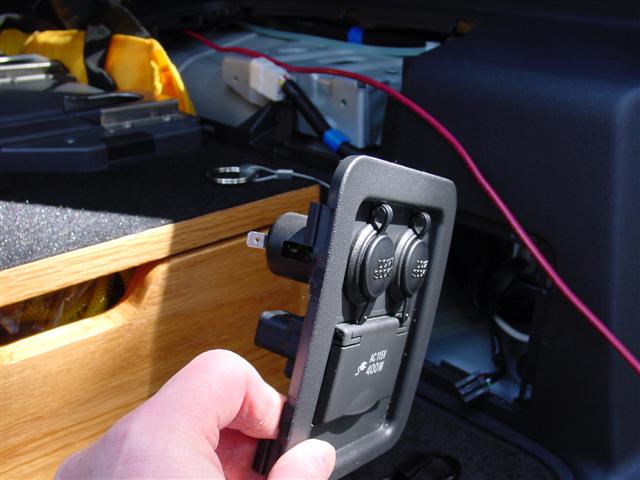
Picture 7 shows the
new Blue Sea box mounted in place with white zipties (no need to screw this unit
down) and the 18-Gauge Red & Black 2-Conductor wire attached to it.
This fusebox also utilizes a ground, so you can attach the black ground wire to
one of the three screws on top, and attach the red power wire to one of the
three screws below.
This box is much nicer than the cheap one I used on the 4Runner long ago.
It did not have a grounding circuit.
Picture 8 shows the 6 gauge wire inside of the black wire loom going down to the
slit in the firewall.
It is all tired in with zipties to the factory harnesses running along the
firewall.
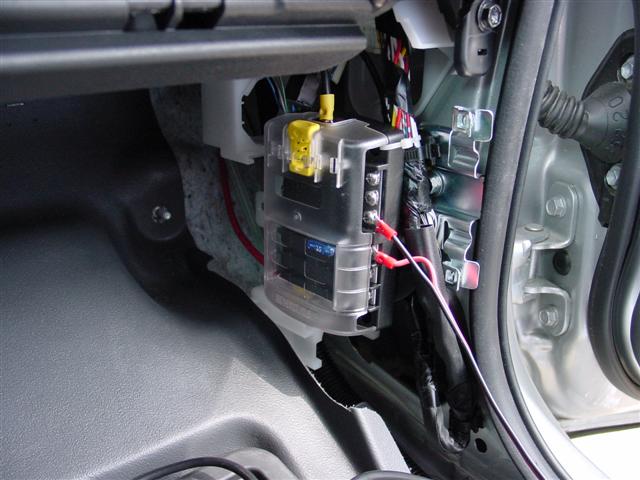

And finally picture 9 shows the twin 12v outlets in place.

After the battery
was put back in place and all the wires were reattached, I carried out the ARB
fridge and set it on the ground and plugged it into one of the 12v outlets.
I reached down and rotated the switch and the green light came on the fridge and
the sweet sound of a fridge coming to life was like music to my ears
From what I have read, the fridge only draws a maximum of 2.7 amps when set to
the highest setting to freeze.
When set to just keep food at the safe temperature to prevent spoilage, it draws
much less and can go for 3 days without wearing your battery down.
This project turned out great.
I am pretty decent at wiring projects, and Wayne is much more experienced at
what we tackled today.
It turned out really good.
I think I will have to hit him up again when it comes time to do the dual
battery setup.
He has that setup and it looks fantastic.
Frozen ice cream bars will be on the menu for this summers runs!
I look forward to getting lots of use from the new ARB fridge and the newly
added fusebox and twin 12v outlets back there.
Update 7-21-2007:
On our Greenwater run I brought plenty of ice cream bars to test out in the new
setup.
I think the picture below proves the ARB fridge/freezer was a great addition to
the trip.

Parts used:
Blue Sea 6 gang fusebox
Radio Shack twin 12v outlets
Dick Cepek
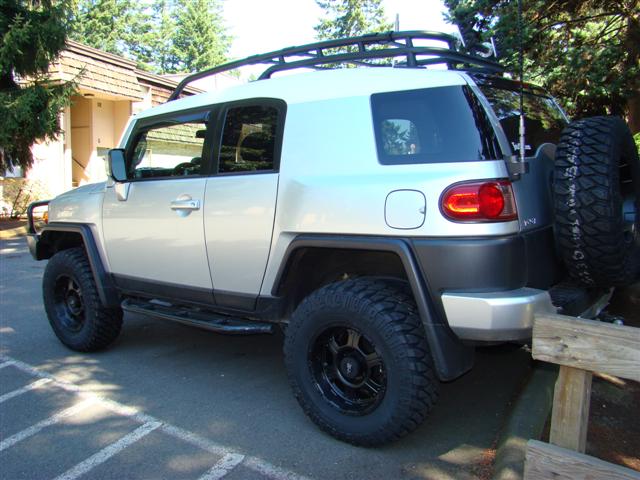
Mountaincats Sized At 285x70x17, And Pro Comp 7089 Wheels Sized At 17x8
Installed 7-31-2007
I really dig the
stock 17" factory alloys, so much I wanted to buy a 2nd set and move up to a
285x70x17" tires, about the same as a 33" tire.
My current Dick Cepek Mountaincat muds are 265x70x17", and they look great, but
a little out of place with the OME 3" lift.
With all of my past vehicles I have owned I have always ran two sets of tires.
One set for fall through spring (winter setup) and the best setup for spring
through fall.
I have been wanting to get the same tires in the 285 size, but did not want to
pay Toyota $340 a piece for the factory alloys.
Great wheel, only factory wheel I have every truly liked that much on any rig.
A little to steep at that price, although I have a few sources to get some used
ones.
At the Greenwater run earlier in July I saw an FJ Cruiser (owned by member
noworries) with some nice black wheels that made me again want to think about
getting an aftermarket wheel.
With some research and getting a hold of the owner gain, I found out they are
the Pro Comp 7089s.
He is running a RevTek 3" lift and 295 size tires with no rubbing, so this tells
me that Pro Comp did their math and is offering these with zero offset and able
to clear the large calipers of the FJ Cruiser.
I was able to score these wheels for $129 a piece from 4WD Parts who owns Pro
Comp wheels/tires.
Les Schwab would have had to buy them for $209 a piece since they are a direct
competitor of 4WD Parts Warehouse.
You will not find these on the Dick Cepek website, as they are exclusively made
for Les Schwab Tires.
Made in the same molds as other Dick Cepek tires with the familiar staggered DC
impression on the sidewall.
These tires are also made by Cooper, and are pretty similar in design to the
Cooper Discoverer STT tire.
They showed me out in the bay when we turned the wheels/tires lock to lock that
they cleared the body mounts and also the calipers.
In getting new wheels for your FJ Cruiser, the important thing to pay attention
to is the off set.
Mine are zero.
He asked me if I wanted to step up to a 295 since that is what noworries is
running, but I stayed with the 285s.
They look great and 33" is big enough for me.
I did not notice any loss of power at all coming into work on the backway, and
also going home on the freeway where I was able to put the throttle down some.
Went with black Gorilla small diameter Tuner lugnuts that take a special
adapter/key to take them off with.
I also compared the speedometer to my Pioneer navigation systems GPS which is
dead on for MPH, and there is no variance at all after going to the bigger tire.
So when the speedo says I am doing 60 MPH, the GPS reports the same.
After I get these off road, I will get some better pictures.


Parts used:
Dick Cepek Mountaincats from Les Schwab Tire Center
Pro Comp 7089 wheels
Gorilla small diameter black chrome
lugnuts, 12mm x 1.50 Part # 21138 HT
Gorilla locking lugnuts, a 5 pack (custom ordered for me
from Les Schwab) 12mm x 1.50 part # 71631NBC
Other wise, a 4 pack of locking lugs in the above type would be part # 71431NBC
Installed new 1
7/8" Fourtreks Rings To Mount The Hi-Lift Jack To The ARB Bumper
Installed 8-24-2007
I ended up taking my Forutreks 1 3/4" rings and Hi-Lift mounts off of the FJs
rack.
I can reach the jack just fine there, but I wanted to get the weight off of the
roof and try it on the ARB bumper up front like I have seen others do.
I ordered the new rings only from Fourtrek owner Luke, and they arrived a few
days later.
Very simple job, I just removed first the mounts from the old rings which were
still on the roof rack (no longer though) and installed the new 1 7/8" rings to
the ARB bumper.
You can see in the photos below about how far out they are positioned.
If you do yours the same way, the Hi-Lift should slide on very easily.
At first I put down some black electrical tape for protection, do not do this.
When going to work the next day with the jack on to test it, the rings slid
downwards a bit, and almost into the bumper.
I redid them without the tape, and I ran the jack for three consecutive days
without and movement of the rings at all.
The only thing I
have to do now is try to isolate the noise of the jack as it is pretty noisy up
front from rattling on uneven roads and railroad tracks.
That can be fixed easily, as it is only the base plate on the jack rattling.

Parts used:
Fourtreks 1 7/8" rings and Hi-Lift mount (Used
my old mounts, just ordered new rings)
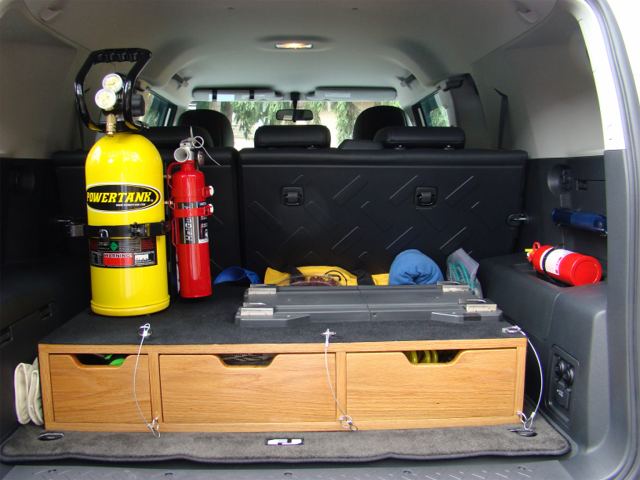
HalGuard HG250R
Fire Extinguisher
Installed 9-14-2007
II needed a new fire
extinguisher for the rig as my other two bottles are of the dry chemical type,
and after much research on the Internet (wonderful invention is it not?) I
realized any dry chemical fire extinguisher is not good for your rig!
It corrodes components, ruins wiring, and oh so much more nasty stuff.
Avoid them like the plague.
Do yourself a favor and invest some extra money in a "premium clean agent" fire
extinguisher.
The nice thing about the HalGuard system is it is a "premium clean agent" which
means it will not corrode like a dry chemical fire extinguisher can.
You can spray this stuff under your hood, under your dash, even your home
computer and it is not suppose to short circuit or corrode anything.
Here are a few quotes from their website which I will have links at the end of
this entry.
HalGuard is no ordinary fire extinguisher.
It contains an electrically non-conductive "clean" extinguishing agent that
rapidly turns into a gas.
* No thermal shock to electronics
* No mess or damage to vehicle or surfaces
* Liquefied gas extinguishes hard-to-reach fires
* Does not impair operator's vision
* EPA approved
* Listed and rated 2B:C by Underwriters Laboratories
* Rechargeable
* Made in U.S.A.
* 2-strap mounting bracket
* 6' - 10' discharge range
* High quality steel cylinders
* All metal valve construction
* Compact, lightweight, easy to use
* One year limited warranty
I drilled 4 holes into my Powertank bracket and bolted the HalGuard mount to it.
I may raise it up to the next higher position, have not decided yet.
I bought this from a reseller, they have many listed on their site.
More than likely you will also get charged a $20 hazardous shipping fee, and it
has to come ground.
They do not ship these on aircraft.

Parts used:
H3R Performance, their website
HalGuard H250R fire extinguisher
Kidde
Fire Extinguisher
Installed 9-16-2007
This is a
continuation of the above entry.
I took my old Kidde BC rated fire extinguisher and laid out the mounting bracket
for it on the right rear shelf tray that is below where I have my Maglite
mounted.
The tray snaps out very easily, and I only had to to drill two holes into it and
mounted up the bracket, then placed the Kidee into it, then snapped the whole
thing back into place.
Total time to do this simple but safety oriented mod was about 15 minutes tops.
This fire
extinguisher will not be used to put out a fire on the rig, as it is of the dry
chemical type, and it will leave residue behind which can corrode wiring and
other components on a rig.
This will be used only for fires outside of the rig.
One can never have enough fire extinguishers in their rig.
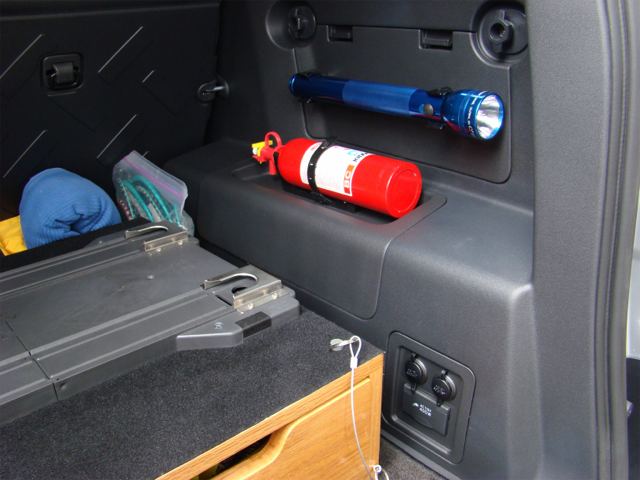
Here is a shot with the ARB fridge in with the new extinguisher, kind of a tight fit ;)

More Mods On The Next Page
Please click here to go to back to page 1
Please click here to go to page 3